Because Microsoft altered the placement of the Teams recording, you are not alone if, like this Microsoft Teams Meetings customer, you are having trouble finding your Teams meeting recordings.
This post will walk you through the process of locating your Team recordings so you may download, share, and watch them. Let’s go right in.
Where Do Microsoft Teams Store Recordings?
At first, Microsoft Stream was automatically where all Teams recordings were saved.
Due to a change made by Microsoft, all Teams recordings are now kept on OneDrive or SharePoint, depending on the kind of meeting.
For channel Teams meetings
The recordings are accessible to all channel members and are stored on the team’s Sharepoint in a Recordings folder under the File tab.
There are various channels in Microsoft Teams for topics, projects, company departments, and more. A SharePoint folder containing all of your team files will be created as soon as you start a new channel in Microsoft Teams.
For non-channel Teams meetings
The individual who started the recording has the recordings saved in their OneDrive Recordings folder. The tape of the meeting is available for viewing by all those invited, but editing is restricted to the meeting organizer or initiator.
For the following reasons, non-channel meetings may be held:
- Speaking on the phone with a colleague in a separate division
- organizing a video conference for the group
- Making a call to someone who is not in your organization
How to Find the Teams Meeting Recordings?
Let’s examine how to locate the team recording location in more detail now that we’ve covered the fundamentals of it.
1. Teams recording location for Channel meetings

These are uninvited meetings that take place in a Teams channel and are therefore open to everyone in the channel.
Sharepoint is where Team records for channel meetings are kept, as was previously mentioned. To find the recording, take the following actions:
Find the team and channel that are specific to you by visiting Microsoft Teams.
Select the “Files” tab from the top navigation bar of the channel.
Choose the “Recordings” folder after that.
Read More: https://www.therconline.com/tech/how-to-make-google-docs-dark-mode/41614/
2. Teams recording location for all other meetings
- Standard, private, or non-channel meetings—also referred to as private or personal meetings—keep meeting details confidential from participants.
- When the recording is ready, they will receive an alert and find it in the OneDrive folder on the meeting recorder.
- On your PC, open the OneDrive directory.
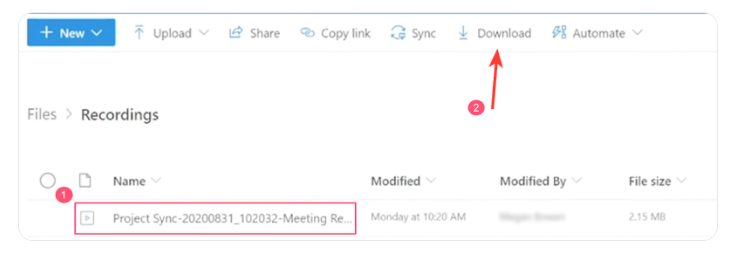
- After that, select the “Recordings” folder. Your meeting recordings will all be listed here.
- encircling the recordings with a red rectangle frame.
Notes of importance about Team recording:
- Teams will continue to record meetings even after the person who initiated them leaves.
- A recording will automatically expire and be removed after a set amount of time. The administrator determines how long the Record will be available.
- Shared notes and whiteboards are not recorded by the recording feature.
- Following the conclusion of the meeting, teams automatically cease recording.
- In certain organizations, teams will not start recording until you have received permission from all participants to do so.
- Listen to, save, distribute, and remove a team recording.
- There are various things you can do with a Microsoft Teams recording once you’ve found it, including playing, downloading, sharing, and deleting it. These are the steps needed to complete each task.
Play a Team recording

- Should the meeting be arranged, it will be shown on the team’s calendar. Select the Details tab to view and listen to the recording.
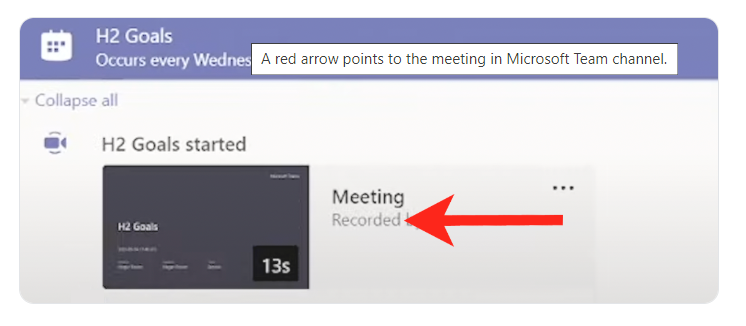
- In the event that it was a channel meeting, navigate to the channel chat and select the recording to start playing.
- The meeting in the Microsoft Team channel is indicated by a red arrow.
Share a meeting recording
- A meeting recording can be shared via Teams with attendees as well as non-participants.
- Locate the recording in OneDrive or SharePoint.
- Click “Share” at the top of the page after selecting it.
- Copy the link, add the recipients’ email addresses, and then press “Send” to share it with them.
- An email address is added, and a rectangular frame appears around the Send button.
Download a Meeting Recording
Downloading a meeting recording is restricted to the meeting organizer or the person who initiated the recording.
Using SharePoint or OneDrive to download a recording:
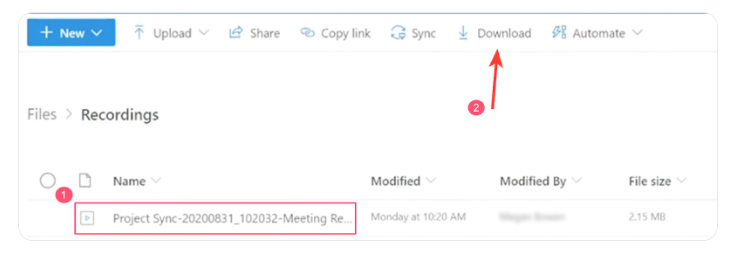
- You can download one or more recording files by selecting them.
- Select the ‘Download’ option located in the upper navigation bar.
- When your browser prompts you to select a location to save the recordings, select Save or Save As.
- The downloaded meeting recordings file and the indicated download option.
- The majority of PCs will immediately begin downloading. But, there may also be a window where you have to select the file’s location for saving.
Read More: https://www.therconline.com/tech/how-to-unmute-posts-on-instagram/41602/
Delete a meeting recording

To remove a video from OneDrive:
- Navigate to the OneDrive webpage.
- To choose the file you want to remove, click the circle box that shows up.
- The bar at the top of the page will say “Delete.”
- In SharePoint, to remove a recording:
- Navigate to SharePoint, click on the document library, then choose the Teams recording that you wish to remove.
- To delete a file, right-click on it and choose “Delete.”
- When the dialog box for the delete confirmation displays, click “OK.”
