Use caution when posting images to social media or instant messaging applications. You can unintentionally divulge private information such as your bank account number, email address, mobile number, or your child’s face. Fortunately, you may conceal such information in a photo on your Android phone without the use of a specialized photo editing program.
Would you like a face or other object in a photo to be blurry? To finish the task, you can use third-party choices from the Play Store or the Android default gallery apps. To obscure certain areas of a photo, let’s start with Google Photos and the Samsung Gallery app before moving on to other programs.
Blur a Face or Other Part of A Photo with Google Photos
Google Photos, the Android default gallery app, has a ton of features and provides a wide range of image editing choices. To conceal sensitive information in a photo, use the Blur tool. The Google One subscription includes access to this service. To enable the feature in Google Photos, you must subscribe to one of the Google One plans.
Step 1: On your Android phone, launch the Google Photos app.
Step 2: Choose the image you wish to modify.
Step 3: Select “Edit” from the bottom.

Step 4: Navigate to the menu for Tools.
Option 5: Click Blur.
Step 6: Draw a circle around an area you wish to keep visible. The blur effect’s intensity can be changed by adjusting the slider at the bottom.
Step 7: Choose Depth and adjust the blur area by dragging the slider.
The goal of Google Photos’ Blur function is to give your photos a portrait look. It can also be used to conceal private information. But as the screenshots above show, it doesn’t offer fine control over picking out a certain area of a photo.
Read More: https://www.therconline.com/tech/why-does-my-hotspot-keep-turning-off/41362/
The Galaxy Gallery app
Samsung provides a functional Gallery app by default on Galaxy handsets. It enables you to accurately blur out a portion of the image. Also available is the pixelate effect. Samsung provides all the necessary add-ons for Galaxy Phones running Android to blur photos. Let’s see it in operation.
Step 1: On your Samsung phone, launch the Gallery app.
Step 2: Choose the picture you wish to modify.
Step 3: Press the bottom pencil icon.
Step 4: Click the icon of the emoji. Press Draw.

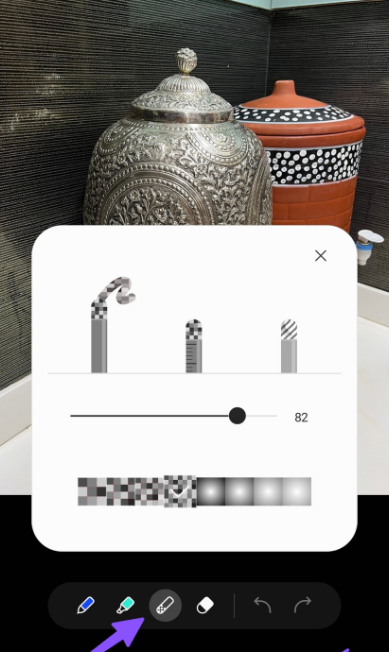
Step 5: Choose the icon that is pixelated, or checkered. To view the customization choices, tap the same symbol once again.
Step 6: The degree of pixelation or blur effect can be chosen. Next, use the slider to change the intensity.
Step 7: Blur your face or an object in a photo with your finger or an S-Pen (if your Samsung phone is compatible). In the upper-right corner, select Save.
Apple Party Apps
The Google Play Store is brimming with third-party photo editing apps. Although the majority of apps function as intended, Point Blur’s user-friendly interface and flawless functionality caught our eye. Let’s see it in operation.
Step 1: Open the Google Play Store and download the Point Blur app.
Step 2: Launch the application and grant it the necessary access to the device’s storage by opening it.
Step 3: Edit Tal. Choose the picture you wish to modify.

Step 4: Before doing any modification, you can crop an image. Press Full or Crop, depending on your choice.
Step 5: You may use the slider to expand the blur region, adjust the blur level (strength), and use your fingers to blur a specific section of a picture.
Step 6: By default, a picture is blurred. In the lower-right corner, tap Type. There are a number of options available to you, including Blur, Mosaic, Mosaic2, Triagle, and Honey.
Read More: https://www.therconline.com/tech/apple-watch-symbols/41291/
Step 7: Check levels, edit the photo, and choose an appropriate type to conceal the sensitive information.
To adjust hue, warmth, saturation, brightness, contrast, and saturation, you can also use the toolbar above. To download the altered image to your phone’s storage, click the Save icon in the upper-right corner.
Emojis are another tool you can use to highlight or conceal someone in an image. Compared to blurring or adding a pixelated look, it is a far superior option.

